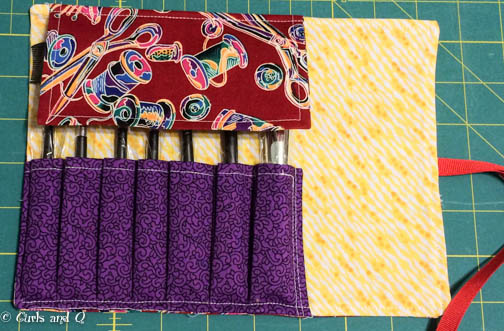
Sewing Tip: A make-up brush set it the BEST lint cleaners for your sewing machine and overlock machine. The little brushes get into the tiniest of spots. Thanks to theDealyo for the heads up on a inexpensive, free shipping site for the brushes. I bought two sets, one for Curls and one for me. Using the cheesy brush holder, which the bushes came in, as a template I designed a holder out of fabric from my stash.
Materials:
- Three fabrics
- Pellon iron-on interfacting
- Ribbon for ties
- Normal sewing supplies; machine, rulers, etc
Cut:
Main fabric:
- 2 – 10″ x 7 1/2″ – For back and inside
- 1 – 7″ x 6 1/2″ – Flap, Fold lengthwise
- 1 – 7 1/2 ” x 9 1/2 – Pocket – Fold lengthwise
Iron-on Interfacing:
- 1 – 10″ x 7 1/2 ” – Line main fabric
- 1 – 3 1/2″ x 6 1/2″ – line 1/2 of flap
- 1 – 3 ” x 9 1/2″ – line 1/2 of pocket
Seam allowance: Use 1/4″ seam allowance.
Placement and Measurements:
Steps:
1. Iron the interfacings to the one piece of the main fabric; the top-half flap fabric; and the top-half pocket fabric. (Sorry I did not photograph this step)
2. Sew the side seams of both the flap piece and the pocket piece together right-sides-facing. Trim the corners and turn right sides out. Press. Top stitch both the flap and the pocket pieces.
3. Using the following measurements, place the flap onto the interfaced main fabric. Use a stay-stitch to hold the flap in place.
4. Use a running stitch on the left side of the pocket to hold it in place.
5. Line up the right side of the pocket so it is inline with the right side of the flap. Sew the right side of the pocket down. There will be a gap of fabric which you will be pleating.
6. Using about an 1/8″ pleat make 7 pockets. I pinned the edge to itself until they all fit. I sewed one pocket at a time, starting at the far left pocket.
7. After cutting the ribbon, I cut one end of each ribbon at a 45 degree angle and used Fray Check on them so they would not fray. After the ribbon ends dried, I lined the uncut ends up with the right edge of the main fabric at the 1/2 way mark and sewed down.
8. Put the outside fabric on top, right sides together. Making a brush holder “sandwich”. Making sure the “hanging” ribbons are not going to be caught in the seam. Sew sandwich together using a 1/4″ seam, and leaving a least a 2″ opening to put the fabric right side out. Double stitch on either side of the opening. Trim the corners, pull the fabric right side out and PRESS!
9. Add brushes and admire your handiwork. Here it is with the flap down. Since this was Curls’ gift, I didn’t take the cellophane off of the brushes.
Brush holder folded up and ready to go on a sewing trip with the machine!
 Thanks for stopping by for a visit. Now, go have a crafty day!


Thanks for the brush tip! Never owned one of those.
LikeLike
Q – My mom was full of them!
LikeLike