Sew and Knit Worthy

Sew and Knit Worthy

Sew and Knit Worthy

Received this picture and the following text from my daughter, “Our windows are being replaced, so we’re eating dinner outside and it’s a bit chilly so I bundled up LM and realized he’s using 3 blankets and a beanie that Gma made!” Love it! LM (Little Man) is sooooo sew and knit worthy! The items that grandma (me) made are the fleece blanket behind his head, the two flannel blankets covering him, and the hat.

For the fleece blanket I wanted a different type of edging so it is edged using the Looped or Optional Braided Edging. It can be a no-sew edging. I did run a 2 inch stitch around the blanket before cutting the tabs.

For the flannel blankets I used a yard of two different patterned flannels. With right-sides together, I  sewed a 1/2 inch seam around the blanket leaving a 2 inch gap so I could turn the blanket right side out. After sewing closed the opening, I stitched around the edge with a decorative stitch. If you look closely, you can see the heart-stitch edging on the dog blanket.

The hat is the Owl Cable Cap pattern and is found at the Comfort Wool blog. There is an Owlie Sleep Sack which matches the hat.

For anyone worried that LM has crazy parents for replacing windows during winter time, we live in San Diego and the “chilly weather” was in the high 50’s. BTW, those are my “daughter’s eyes” staring out at you.

q8

FO Friday: Baby’s Lotta Snuggler

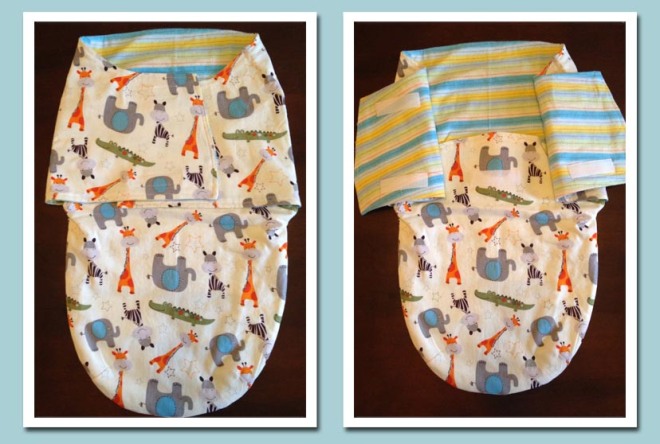
q~Could not pass up that tongue in cheek. Baby’s Lotta Snuggler was made using the free online pattern from Lotta Jansdotter. The outside is a cotton print which, of course, features elephants. The inside is flannel. Baby is due on Labor Day (how appropriate). Here in San Diego September and October are usually Indian Summers: hot days and cooler evenings. Our weather during these two months is not usually fleece wearing time, baby would get way too sweaty. Thanks Em for taking the pictures, the left side shows the closed snuggler and the right side shows it open. So excited that we found an adorable baby elephant wash cloth which Emily is knitting. I really want one of my daughters to love knitting as much as I do. Maybe she’ll let me feature it next Wednesday.

Baby's Lotta Snuggler

Baby’s Lotta Snuggler

And, as usual, it’s Finished Object Friday so drop by Tami’s Amis and see some of the other items crafty people have completed.

Baby Pattern Queue

q~With thoughts of sewing and knitting for baby floating through my head, I’ve been grazing through the Internet for baby patterns. This is the first grandchild I’ve had since retiring so I have plenty of time to sew and knit. I’ve included the burp clothes.

burb1 Burb cloths made from cotton diapers

Instructions:

1. Dye cotton diapers to desired colors.
2. Measure the “thick” middle part of the diaper.  I think these were 12″ by 5″
3. Cut the accent fabric 1/2 inch longer and wider than the measurement in Step 2.
4. On the accent fabric, turn under 1/4 inch all around and iron down.
5. Place accent fabric on the diaper. pin in place and use a zig-zag stitch around.

burp2Contoured Burb Cloth pattern found at Cloud9 Fabric blog.

Dye flannel to desired color.

I found I like the iDye brand best for cotton. It gives a nice bright color. The Dylon brand tended to give a washed out look.

0866-CGN-Crib_Sheet-1Crib sheet found at Sew4Home using Michael Miller fabrics. I purchased the most fabulous fabric for the sheets designed by Windham Fabrics and by Riley Blake Designs.

Elephant pillow pattern and directions. Michael Miller no longer has the Boy’s Nursery at it’s site.

Bumper pads are not deemed dangerous and our baby boy won’t have any in his crib.
nested bibThis pattern is from Nested blog.

I’ve already dyed the terry cloth backing fabric. The main fabrics will be from the selection used in the burb cloths.

The pocket will not be added since these are to be used during infant teething time, would be better named “Drool Catchers”.

If baby boy is like Daughter Darcey, he’ll start drooling on Day One.

diaperpouchtutorialmeDiaper Pouch Tutorial found on Noodlehead blog.

The tutorial calls for linen scraps. I’ll be using cotton. Linen might be a firmer weave, but is scratchy and needs to be ironed after washing.

A heavier cotton would also work nicely.

Other sites with wonderful free sewing patterns:

Made by Rae

Noodlehead

SOS for Soakers

~This text arrived from daughter Sarah: “I just sent u a pattern and hoping ur in the mood to sew some fleece diaper covers for Bug. 8-)” A texting flurry ensued and this is the outcome. First surfed the web for a pattern. The best pattern is at Katrina’s Blogspot. She has a free pattern for sizes newborn to extra-extra-large. She has links for a extra lining for the soak zone, yardage layouts, instructions, and sizing chart. Texted the sizing chart back to Sarah. I printed out the patterns for the soaker and the liner. Sarah measured my 8 month old grandson – size large! After looking at examples on Etsy, I decided I wanted two different fabrics; one for the main body and one for the waistband and leg cuffs. Off to the fabric store. I purchased a non-pill, ocean-themed fleece for the body and and a solid, blue, regular fleece for the trim. There was a link for the pattern layout but it was for the soaker to be constructed entirely of the same fabric. I purchased 2/3 yds of both fabrics. I ended up with 6 soakers; I mixed and matched the liner, cuffs, and body. This should be enough soakers to last a few days.

Constructing the soakers

Step 1: Zigzag the liner onto the inside of the body.


Step 2: Using 1/4″ (one-quarter inch) seam allowance, sew the side seams of the pants, the waistband ends together, and the leg cuff edges together. I baby-locked the edges of the pants, but not the trim. I didn’t want the additional bulk for the trim.

Step 3: Divide the body into 4 equal parts and mark the quarter spots. Repeat with the waistband and two leg cuffs. Notice the white mark on the waistband and the purple mark on the body.

Step 4: Pin the waistband to the body, matching 1/4 marks. Stretch the waistband to fit the body, pin and sew. Repeat with the leg cuffs.

Step 5: After attaching the waistband and cuffs, baby-lock or zig-zag the seams. This is what the finished inside should look like:

Finished soaker. I chose an ocean theme since “my” baby lives in Hawaii. Surfs up dude! 😎 I sent them off – I am so proud of myself. I HATE going to the post office.

Here is precious Bug, the upcoming rock star, modeling the soakers! Aloha Bug!

Sarah says he keeps sitting down to feel the soakers. 😎

Love seeing Bug sitting in his favorite position in the soakers.

These are so easy to make and super quick to sew! Share pictures if you make some!