Brushes Need A Lovely Holder Too

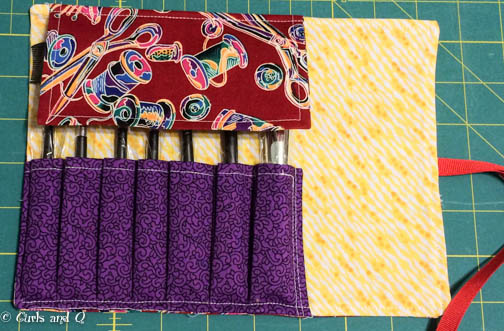
Finished brush holder, flap up

Finished brush holder, flap up

Sewing Tip: A make-up brush set it the BEST lint cleaners for your sewing machine and overlock machine. The little brushes get into the tiniest of spots. Thanks to theDealyo for the heads up on a inexpensive, free shipping site for the brushes. I bought two sets, one for Curls and one for me. Using the cheesy brush holder, which the bushes came in, as a template I designed a holder out of fabric from my stash.

Materials:

  • Three fabrics
  • Pellon iron-on interfacting
  • Ribbon for ties
  • Normal sewing supplies; machine, rulers, etc

Cut:

Main fabric:

  • 2 – 10″ x 7 1/2″  – For back and inside
  • 1 – 7″ x 6 1/2″ – Flap, Fold lengthwise
  • 1 – 7 1/2 ” x 9 1/2 – Pocket – Fold lengthwise

Iron-on Interfacing:

  • 1 – 10″ x 7 1/2 ” – Line main fabric
  • 1 – 3 1/2″ x 6 1/2″ – line 1/2 of flap
  • 1 – 3 ” x 9 1/2″ – line 1/2 of pocket

Seam allowance: Use 1/4″ seam allowance.

Placement and Measurements:

Placements and measurements

Placements and measurements

Steps:

1. Iron the interfacings to the one piece of the main fabric; the top-half flap fabric; and the top-half pocket fabric. (Sorry I did not photograph this step)

2. Sew the side seams of both the flap piece and the pocket piece together right-sides-facing. Trim the corners and turn right sides out. Press. Top stitch both the flap and the pocket pieces.

Sew the flap and pocket pieces

Sew the flap and pocket pieces

3. Using the following measurements, place the flap onto the interfaced main fabric. Use a stay-stitch to hold the flap in place.

Flap placement

Flap placement

4. Use a running stitch on the left side of the pocket to hold it in place.

Running Stitch to hold pieces down

Running Stitch to hold pieces down

5. Line up the right side of the pocket so it is inline with the right side of the flap. Sew the right side of the pocket down. There will be a gap of fabric which you will be pleating.

Tack down pockets

Sew down right side of pocket

6. Using about an 1/8″ pleat make 7 pockets. I pinned the edge to itself until they all fit. I sewed one pocket at a time, starting at the far left pocket.

Flap and pocket placement

Flap and pocket placement

7. After cutting the ribbon, I cut one end of each ribbon at a 45 degree angle and used Fray Check on them so they would not fray. After the ribbon ends dried, I lined the uncut ends up with the right edge of the main fabric at the 1/2 way mark and sewed down.

Ribbon attachment

Ribbon attachment

8. Put the outside fabric on top, right sides together. Making a brush holder “sandwich”. Making sure the “hanging” ribbons are not going to be caught in the seam. Sew sandwich together using a 1/4″ seam, and leaving a least a 2″ opening to put the fabric right side out. Double stitch on either side of the opening. Trim the corners, pull the fabric right side out and PRESS!

Sandwich the layers

Sandwich the layers

9. Add brushes and admire your handiwork. Here it is with the flap down. Since this was Curls’ gift, I didn’t take the cellophane off of the brushes.

Finished holder flap down

Finished holder flap down

Brush holder folded up and ready to go on a sewing trip with the machine!

Finished, folded and tied brush holder

Finished, folded and tied brush holder

QThanks for stopping by for a visit. Now, go have a crafty day!

Finished Object Friday: Thundering Elephants

Elephant-print  Fabric Bins

Elephant-print Fabric Bins

Office Set

Office Set

Thundering Elephants office set sitting in my daughter’s office. The next time I visit I’ll be checking to see what she has hidden in the fabric bins. Our Razzle Dazzle Bins blog on Jan 5 is a tutorial on the construction of the bins. Although I hate it when I goof up and try to hide any mistakes, I figured any of you dear readers who want to make fabric bins need to learn from my mistake. Notice the elephant lining is upside down in the middle bin. Make sure if you have a one direction print to turn it upside down when you sew the seams together so it folds down right side up. Make sense?

The fabrics work beautifully together, even though they are from two different  manufactures and three different collections.

Fabric:

  • Timeless Treasures Funky Elephant (Mod-C8127)
  • Moda Half Moon Modern Zig Zags Steel #32217 21
  • Moda Half Moon Modern Steel #32357 32
  • Moda Quattro Piccolo Pink #32985 32
  • QThanks for stopping by and spending time with us. Now have a crafty day!

Angry Birds Aficionado

Angry Birds Carrier

Angry Birds Carrier

The gleeful smile and laugh on my Angry Birds Aficionado grandson’s ice cream-smeared face while his arms are immersed into his Angry Birds collection is the perfect payment to me for the collection carrier I surprised him with. Some kids carry their blankie or stuffed animal with them everywhere they go, he carries his Angry Birds. They made the move from Hawaii to here firmly tucked on  his lap during the plane ride. In his pillow pocket, I tucked an Angry Bird surprise packet for him to open.

He’s been using his Christmas stocking to hold his vast collection of birds which was not very efficient since he had to dump them out to look for his favorite piggy with icicles on his face.  I knew it was time for me to come to the rescue and make a special holder. Knowing exactly what I wanted, but not wanting to spend the trial-and-error time developing my own pattern, I searched online for the perfect pattern. Eureka! Blissfulpatterns had the exact pattern I was looking for.  Occasionally, I do like to support designers and buy pdf patterns online. This is an easy 1/2 – 1 hour start-to-finish project.

Materials needed

Materials needed

Materials:

  1. Blue twill fabric for the lining (I’ve had this fabric since my kids were little)
  2. Angry Birds fabric by David Textile (ordered online)
  3. Iron-on Pellon (lighter weight)
  4. Bias tape

Extra sewing notes:

  1. I scaled the pattern to 66% before I printed since he’s three and the basket needed to be more “carrier friendly”.
  2. The stronger twill was used as the lining since there will be a lot of digging inside the basket and the birds and piggies would be causing more friction there.
  3. The pellon was ironed onto the lining to make it nice and firm.
  4. To make the basket more colorful, I chose a bias tape with a bolder color instead of matching it to the blue lining.
  5. The bias tape was zigzagged on to make it more durable.
Angry Birds Bag

Angry Birds Bag

I have a nice collection of knitting fabrics. The pattern does have directions for making an optional pocket on the outside. Guess what one of my next projects will be?

QToday is a perfect crafting day!

A Tisket A Tasket, Oh Look At All The Baskets

OK, I admit it! I’m a Pinterest Junkie. Did a search on Pinterest looking for free DIY tutorials for sewn, crocheted, and knitted baskets. Here are a Pinterest Plethora of ideas! Some of my favorites (Click on the pictures to go to the tutorial):

Birch Fabrics Bins by Christina McKinney

Birch Fabrics Bins by Christina McKinney

by Threading My Way

Fond on Threading My Way blog by Pam

Simple Color Totes by Maureen Cracknell Handmade

Simple Color Totes by Maureen Cracknell Handmade

The Simple Color Totes instructions are not given, but they are based on the instructions found at the link.

Yarnspirations Cache Baskets

Yarnspirations Cache Baskets

Knit Moebius Bowl on KnitFreedom by Liat

Knit Moebius Bowl on KnitFreedom by Liat

Lovin’ Swatch Lover

Lovin' Swatch Lover

Lovin’ Swatch Lover

Sewing/Quilting magazines articles on “must haves” for the sewer/quilter are working in this house. Right now I’m making three, same-themed quilts which use 80 different themed fabrics. In order to insure that I get as many different varieties as possible, I needed a good solution. I had seen the Swatch Lover listed as a “must have” in one of the quilting magazines. This has been a wonderful helper when I go to the quilt/fabric store. The tabs are designed so that the fabric swatch goes on one side, and fabric info on the other. To conserve tabs and bulk, I attached fabric swatches to both sides of the tabs. Since all of the fabrics are 100% cotton and come from a wide-variety of fabric companies I’m not worried about collection names, etc. You can see the ring hanging from my Charm Square Holder in the blog picture on Dec. 31, 2014. I attached a binder clip to one of the dividers and hung the ring from it. Easy grab-and-go. The tabs are out of a sturdy plastic and can be re-used, so when I’m done with this project I can remove all of the fabric swatches and start the next project.

QHave a brilliant, crafty day!

What To Do! What to Do!

curls

– What to do about a shirt for my grandson. Last year I made a shirt for my youngest grandson for his third birthday. See our blog on 2 Aug. 2012, “Shirts Off to You Ryker“. He loves the shirt and insists on wearing it even though it is too small. I decided he needed a new shirt, this time in child’s size 5.

I bought more fat quarters, size 18 inches by 22 inches, to make a new shirt. That’s when I ran into a problem. I placed the the pattern piece on the fabric. Either the fabric was too short or the pattern too long. So I thought, “I’ll turn the fabric sideways even though the trucks will run up and down.” Nope, fabric still isn’t long enough.  Hum, what to do?

shirtfrontIt was still on the cutting board when Q came over for the day. As serendipity would have it, the day before she had been looking through her old Ottobre magazines and saw the cutest boy’s shirt made out of recycled men’s shirts. She came up with the perfect solution for my problem. 🙂 Make a yoke! I quickly drafted a pattern and cut it out. Now I can’t wait to sew it all together. Perfect Solution, Q! 🙂

finishedshirt

(Q – The funny thing is I meant to bring the magazine and show her the cute pattern. I was looking at the magazines for baby ideas. When I saw the boy modeling the shirt. in the Autumn 2010 magazine, I thought, “Wow, that little boy looks a bit like Ryker.” To top it off, the page title is “Wait, Mr. Postman!”, and Barb delivers mail.)

Wait, Mr. Postman - Shirt from recycled shirts

Wait, Mr. Postman – Shirt from recycled shirts

Pillow Pillow Who Has The Case?

–  You to can make a custom pillowcase. Our sister Lindsay got me hooked on making these. I have made one for each of my grandchildren. This iris one is the first one I made for myself. They are fun and easy to make.

First: Choose the fabric.

I tried lots of colors and settled on these colors, because they were a little softer looking than some of the others. I purchased the fabric on our Northwest Journey in February.

As you can see, I am using my sewing journal, that Q and I made, to make notes on sewing a pillowcase. The finished standard pillowcase is about 31″, so these are the figures I came up with.

Yardage amounts needed for a standard sized pillowcase:

  • 3/4 yard of main fabric 
  • 1/4 yard for the border 
  • 1/8 ” for the accent fabric – make make wider or shorter

Second: Cut the fabric.

Cutting measurements: NOTE: Make sure the widths are all about 42 inches.

  • Main fabric:  28 1/4 inches long by about 42 inches wide.
  • Border fabric: 9 inches by about 42 inches wide.
  • Accent fabric: After trimming, fold in half lengthwise and iron. The accent strip can be fabric or soft lace. You can make yours smaller if you like. I like to see it, so I like to make mine wide. My finished cut is 3 1/2″. Now you have your pieces to sew.

Third: Assemble the pieces.

Step 1: Find the center of each piece and place all pieces face up in this order, matching both the centers and the raw edges:

  1. Border fabric piece
  2. Main fabric, or body of pillowcase
  3. Accent piece, which was folded in half and ironed.

The top picture shows the order of the pieces. Notice that the pieces are different widths, that will be trimmed after sewing.

The bottom picture, above, shows the pieces stacked ready to sew. The centers are aligned and the raw edges even.

Step 2: Fold the bottom edge of the main fabric body piece up to the top edge and pin through all layers. It should look like a big tube when finished. Sew a 5/8 inch seam across the top.

Step 3: After sewing, pull the fabric out of the tube. Iron. Now you are ready to trim the excess fabric off of the sides to even the width.

Step 4: After cutting off the excess fabric, pin the wrong sides together. We are making a French seam which requires two step seaming. With the right sides together, pin the sides and bottom together and a sew 1/4″ seam around. I like to use a sewing glove while sewing. It grips the fabric and make it easier to align the fabric pieces. These were a gift from my friend at work. They came two in a pack. I like to use one while sewing, so I gave Q the other one.

Now trim the excess fabric away from the corners. Be sure not to cut through the seam. Turn pillow case inside out. IRON. Now sew 3/8″ seam allowance along the side and bottom. Note: I like to start at the top so it is aligned. I, also, sew backwards 3 to 4 times, since the top gets a lot of wear. Turn right side out and IRON. Ta Ta Your own custom pillow case.

Step 5: Finished

This is the one I finished for my grandson Mason. Can you tell what his favorite past time is? Total time for making a pillowcase is about 1 hour. Deciding what fabric may take longer. Enjoy and sleep tight. 🙂

“You Knew I Was a Material Girl When You Married Me”

Q – This fabulous bird-heart-pattern fabric from Michael Miller Fabrics was on display in Heirloom Quilts & Fabric, Poulsbo, WA.  One of the quilt shops Curls and I visited during our Northwest trip.  I love this quilt shop and visit it every time I’m in the Tacoma area.  I’m a compulsive fiber collector!  I don’t have any idea what I want to use this fabric for, I just love birds and hearts so obviously I had to buy some.  Wonderful ideas abounded.

Aren’t these the cutest high top shoes for baby?  The pattern is from Curby’s Closet, who has the most adorable patterns for baby attire. I just love them.  I have a 5 month old grandson who these would look so darling on.  Only problem, my daughter and son-in-law were thoughtless enough to moved to Hawaii in January, taking all four of my precious grandchildren with them.  These shoes wouldn’t be worn.  Baby Luke spends most of his days in just diapers.  Sigh….

Curls got an idea for the best boy’s shirt, all made from fat quarters.  Each part of the front was a different fat quarter pattern, as the sleeves, and the back.  She collected fat quarters at the different quilt stores we visited.  She had three grandsons so she had a ball collecting fabrics.  One of the shirts will be done in a car theme.  Fun fabrics.  She promised to share the shirts when completed.

One of the most beautiful and friendliest quilt shops we visited was the Wild Rose Quilt Shop & Retreat in Orting, WA.  We wish we lived closer so we could attend a retreat.  On display was a model for the Bucket Bag pattern by Kram’s Kreations.  Really quite wonderful.  Unfortunately, they were out of the interesting fabric that was on the display model.  We love bags!!  Always on the look out for new patterns.  I mean really, can a gal have too many bags?  Barbara found a lot of fat quarters for the shirts.  It was quite fun digging through all of the fat quarters looking for the perfect ones.

Sister Lindsay is a whiz at making pillowcases.  So, when we got over to Missoula to visit mom and her, a trip to Vicki’s Quilts Down Under was in order.  They have TONS of fabric.  The most humorous was a Pickles comic strip print by Timeless Treasures.  Opal is holding an armful of bolts of fabric and says to Earl, “You knew I was a material girl when you married me.”  And, why didn’t I buy some????  I purchased the above fabric and following Lindsay’s instructions, made the pillowcase (the case is folded to fit into the picture).  This is the amount of fabric to purchase for a standard sized pillow:

Main color = 27″
Contrast = 1/4 yard
Trim = 2″

This APQ site has the 1 Million Pillowcase Challenge – Free Patterns. You can find instructions on sewing a wide-variety of pillowcases.

Curls – Yes Q and I had a great time going to all the cool stores. Here are a few of the fabrics I bought to make pillowcases from:

This is one is for my youngest grandchild, he is 2 and the only one who I haven’t made a pillowcase for. This next picture is of the fabric I have chosen for my 4 year old grandson. He is crazy about monster trucks. I still have to get the coordinating fabrics to go with it. This will happen on our next adventure!

This last picture is of fabric I chose to make another pillowcase for myself. I got the fabric from Bear Paws, our last stop.  They are all I use. I just love them.

The other fabrics I bought were for shirts to make for my grandsons. I have a sketch of the idea in my notebook and at a later time, when they are finished, I shall share them with all.

Q -The last quilt store that we had a hard time leaving was Bear Paw Quilting and Bernina in Coeur d’Alene.  Huge store with a lot of ideas, fabrics, books, etc.  Have you ever noticed that if there are too many choices you end up with nothing?  Barb bought some great fabric for different projects, she was on a mission to find iris fabrics.  Mom and Barb’s favorite flower is the Iris. I loved all of the batiks.  Sister Terri made the most beautiful batik quilt.  She shared the pattern with me, I just have not made one.  I have to admit, I love to piece the tops, but HATE to do the quilting, binding, etc.

Can’t remember which shop I saw an idea for a great bag made out of jelly rolls.  They used an antique handkerchief for the outside pocket.  Such amazing ideas.

PS – Forgot to mention these yesterday:

FREE – A Rainbow for My Hands by The BeadKnitter (on display at Yellow House Yarns).  Fingerless gloves using a beautiful Entrelac pattern.  At the store they used Mini Mochi yarn.

Costs – Kaleidoscope Mittens by Little Nutmeg Productionsfrom kid’s sizes to adults.  Can’t remember in which shop these were on display.  Really quite cute.  Too bad (yeah right) the weather here in San Diego isn’t really mitten/glove weather.  One set of gloves/mittens lasts for years!!!

Right now rain is pouring down; it’s cold!  Earlier it was so windy with hail falling that I thought we’d blow away.  Yeah, I’d better rethink the gloves/mittens.  How did it go from the 80’s on Sunday to this today?  Hum.

Fingering the Fabulous Fibers and Fabrics

q8~Raise you hand if your hands start itching and fingers start twitching when you even think of entering a fiber or fabric store!  Our hands are up, in fact, both hands are up.  Now, raise your hand if you’ve seen someone wearing a particularly wonderful looking textured fiber or fabric and you’ve actually asked them if you can feel the item.  Oh yeah, embarrassing.  Fiber junky, I admit it.  In our recent fiber/fabric run from Paulsbo, Wa to Missoula, Mt we got our fix.  This fabulous Angora came from my favorite yarn store in Paulsbo, Amanda’s Art Yarn:

The pattern is Peasant Ruffle Pidge knitted on Skacel Angora Fashion Color Twist.  It takes one skein.  This yarn is like holding a bit of heaven.  My only modification is that I’m not going to add buttons.  I found a beautiful pin to use instead.  The picture doesn’t due justice to the beautiful color.

As a newbie spinner, I was hot to see some roving, batts, tops, etc. At fabulously, wonderful, need-days-to-touch-feel-see, Paradise Fibers I purchased Grey Norwegian Top High Quality 56ct Top.  Yes, there’s that darn Scandinavian “thing” again.  It is my very first spin-a-lot-of-fiber try.  I’m pleased at how it came out.  This is 2 oz, I still have 2 oz to spin and ply.

I just purchased a Lendrum spinning wheel.  I’ve named her Mariah because she spins as the wind!  Tomorrow I’m going to my first spinning retreat with a visiting teacher, Cecelia from Alaska.  I’m enrolled in a spinning class through Grossmont Adult Ed and the teacher, Margaret Tyler help put this together.  I’ll tell you all about it.  So excited.